
How to configure the Zoom integration
Connect your Zoom account to the platform to run live sessions. A mentoring group, for example, can use a video room to bring everyone together. The integration uses two Zoom apps: one opens the room inside the platform; the other creates and manages meetings and looks up the account's users.
You need a paid Zoom account and owner or administrator access to create apps. You also need administrator permission on the platform. The credentials must belong to the account that will host the sessions.
How to reach this screen
On the platform, click your profile picture in the top-right corner and choose Admin panel. In the sidebar, click Search... and look for Zoom, under the Integrations category. Open the matching result to reach the screen below.
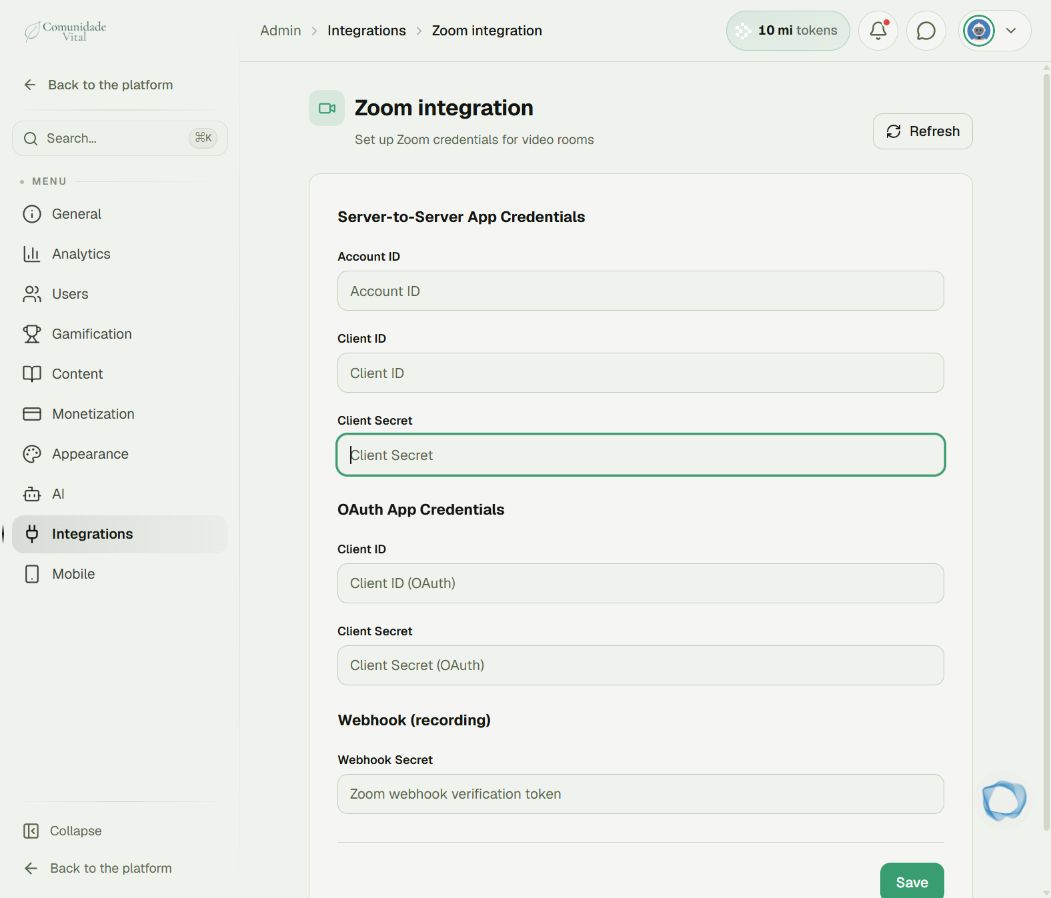
There are three sections, and each takes credentials from a different source. Keep this tab open: you come back to it in step 3.
1Create the OAuth app that opens the room inside the platform
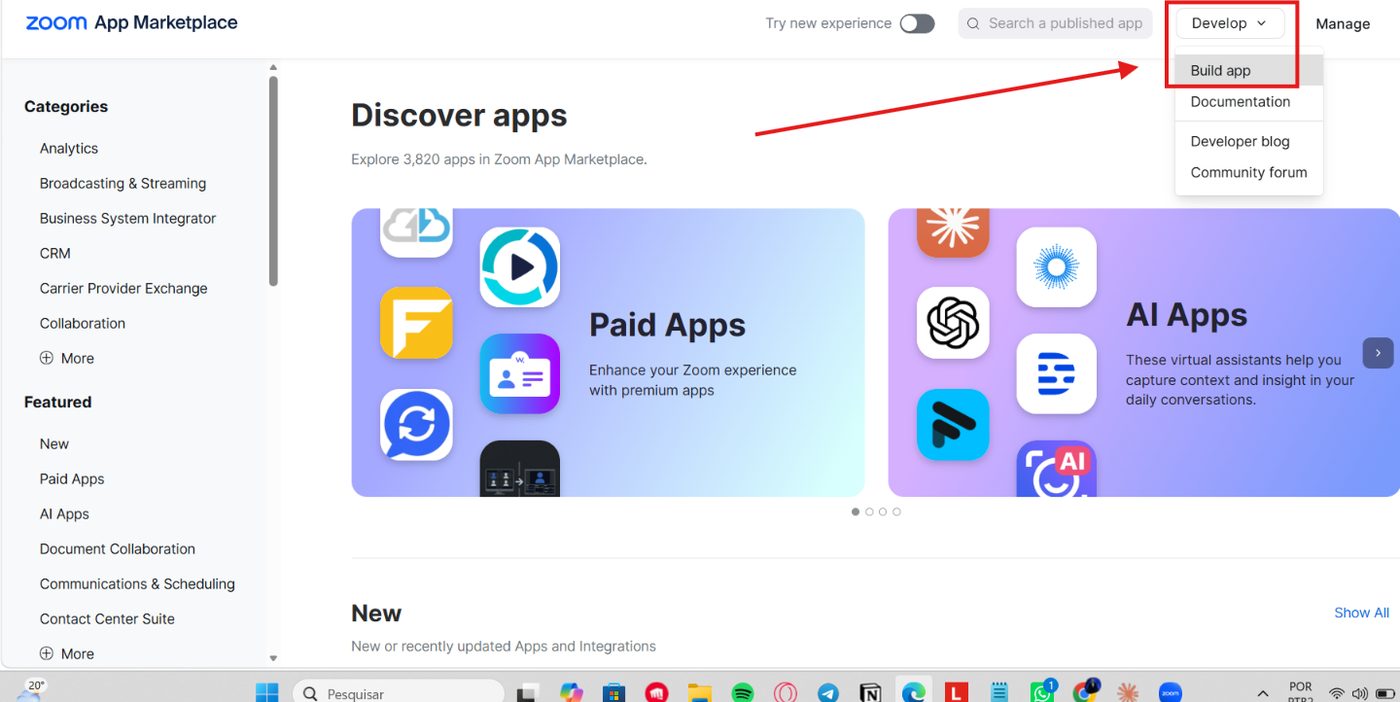
Go to the Zoom App Marketplace with the account that will host the sessions. In the top right, open Develop and choose Build app.
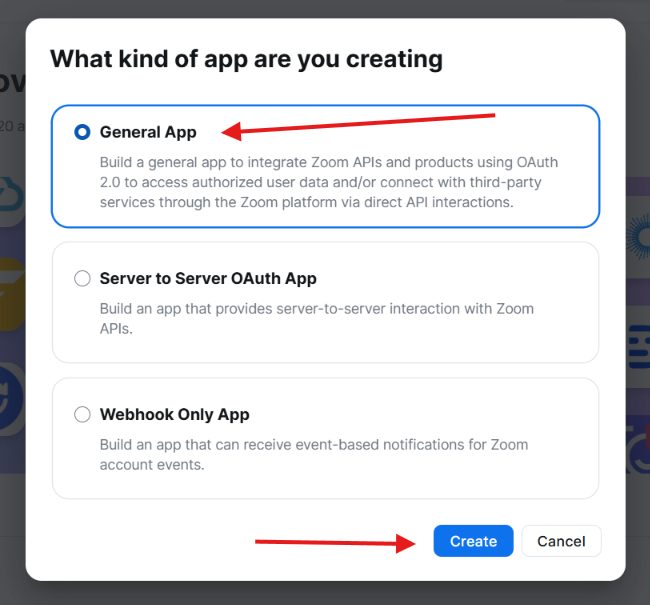
In the What kind of app are you creating window, choose General App and click Create.
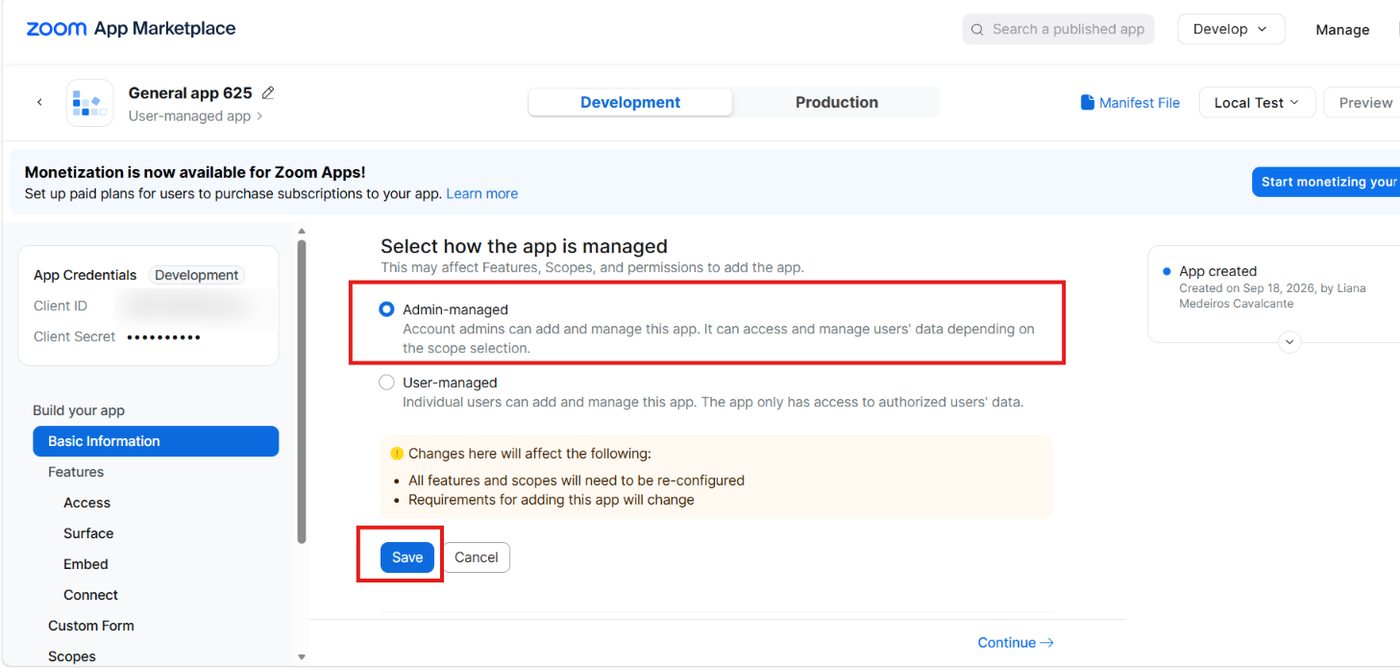
Under Select how the app is managed, choose Admin-managed and click Save. This choice defines which permissions the app can receive — with User-managed the integration does not work.
Still under Basic Information, scroll to OAuth Information and enter the address below in OAuth Redirect URL. If the screen also shows OAuth Allow List, use the same value in both fields.
https://social-api.cativalab.digital/v1.1/meetRoom/zoom/oAuth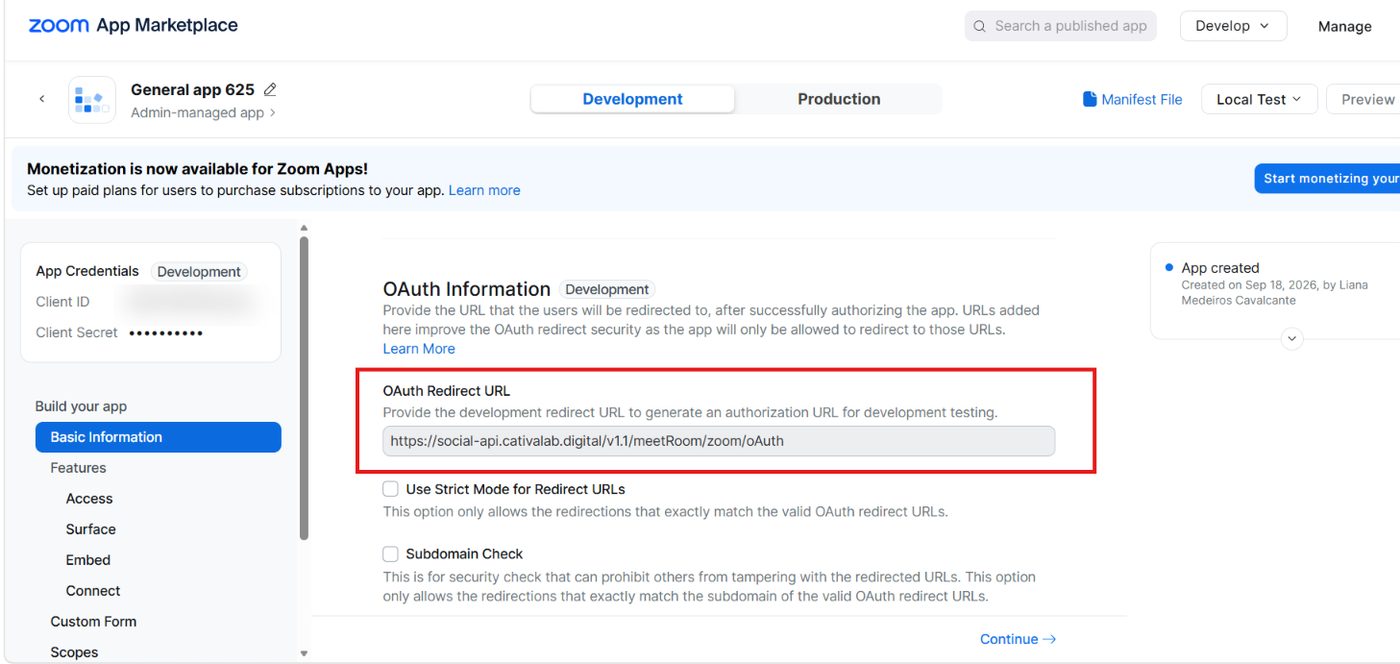
Leave Use Strict Mode for Redirect URLs and Subdomain Check as they are.
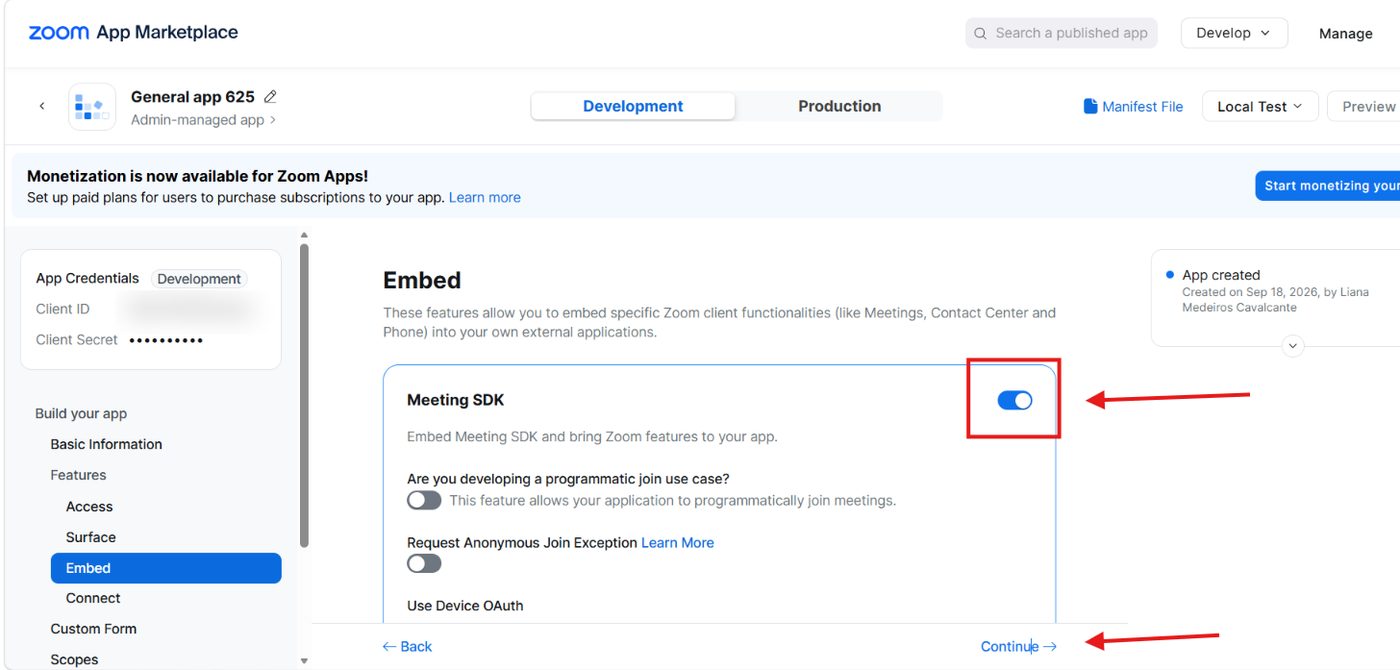
On the Features tab, under Embed, turn on the Meeting SDK and click Continue. That is the feature that lets people join the room without leaving the platform. The toggles just below it — programmatic join and Request Anonymous Join Exception — stay off.
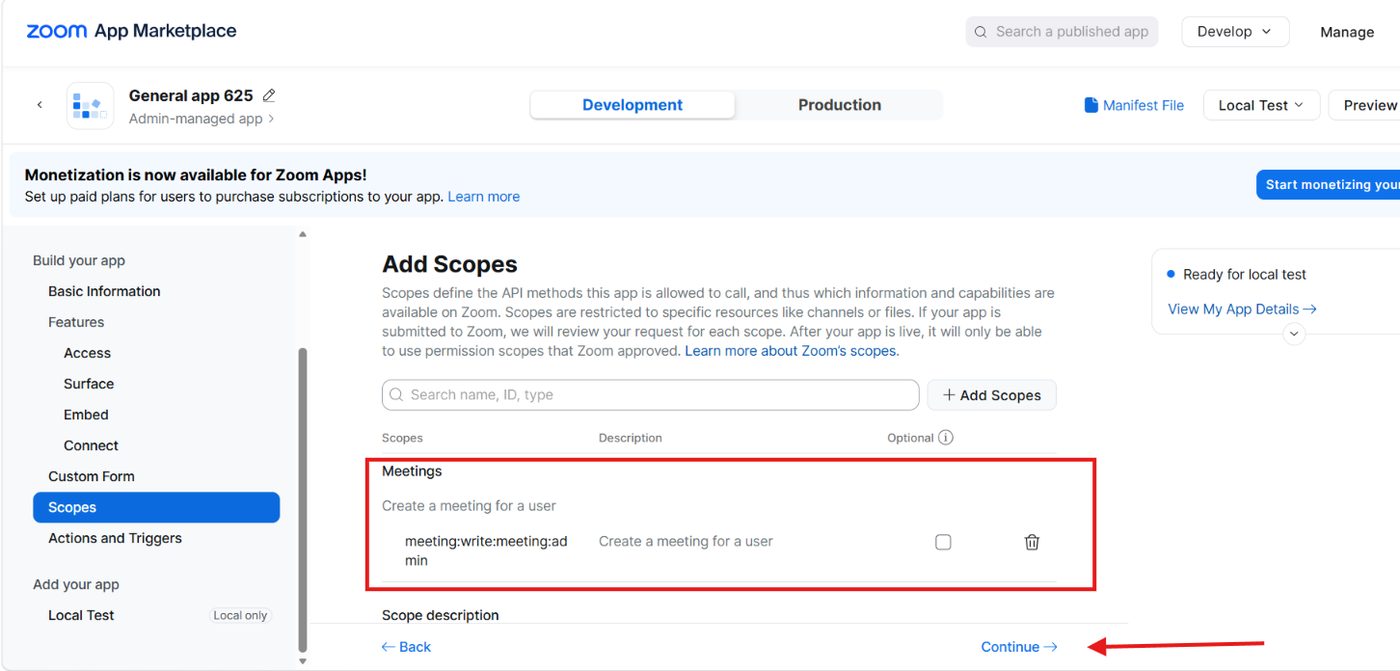
On the Scopes tab, click + Add Scopes and add a single scope: meeting:write:meeting:admin.
Finally, go back to Basic Information and copy this app's Client ID and Client Secret.
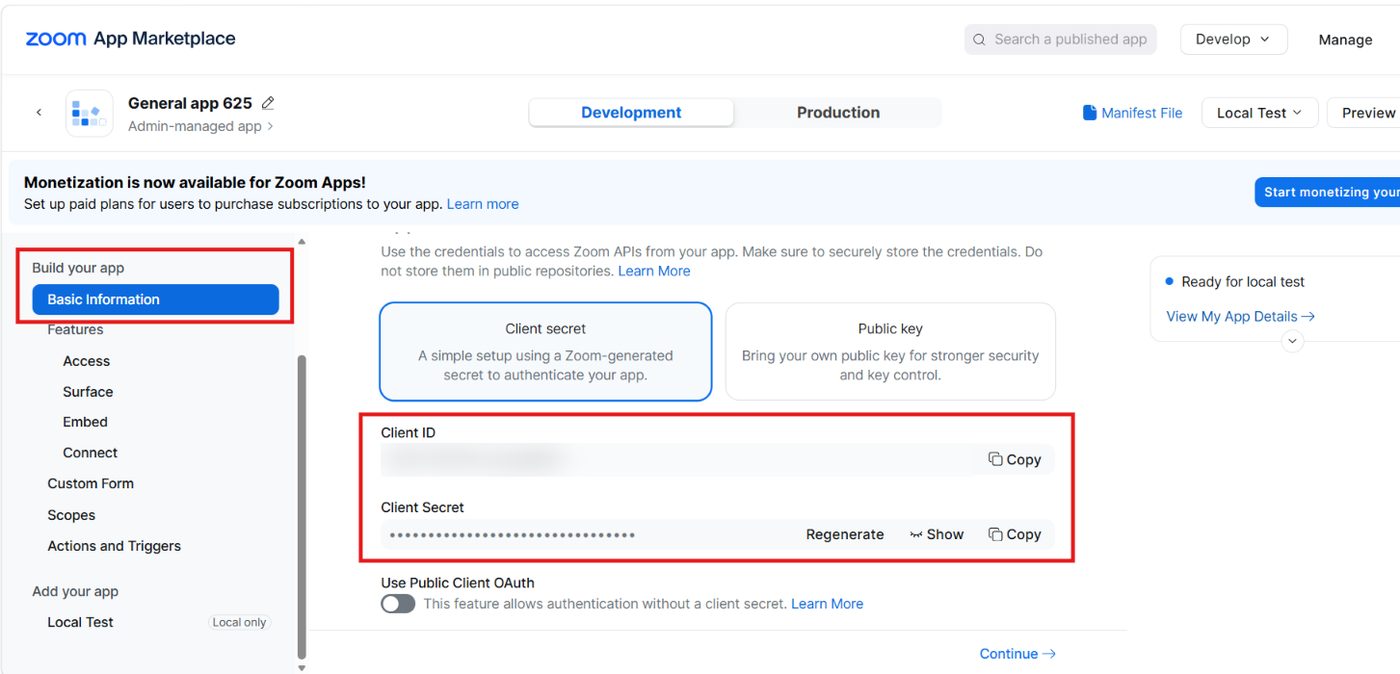
Write these two values down marking them as belonging to the OAuth app. The next app has fields with the same names and different values — swapping them is the most common mistake in this setup.
2Create the Server-to-Server app that manages meetings and users
Go back to Develop › Build app and this time choose Server to Server OAuth App, then click Create.
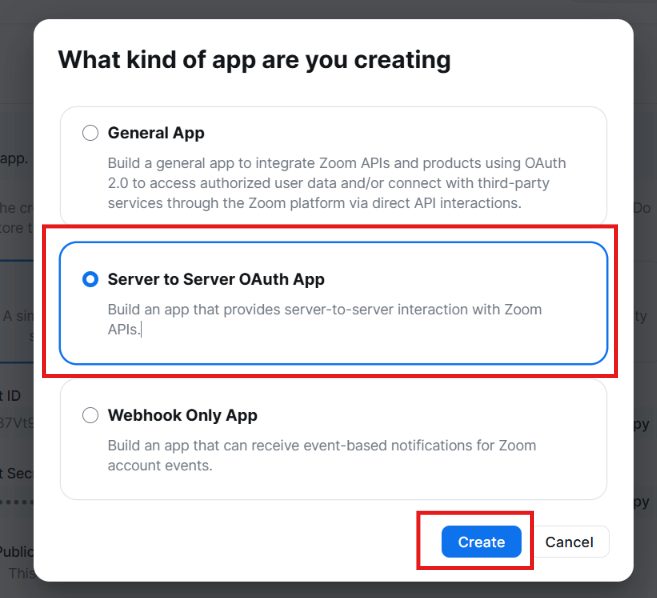
Zoom asks for the name before opening the app. Under App Name, type exactly Cativa Integracao — without accents — and click Create.
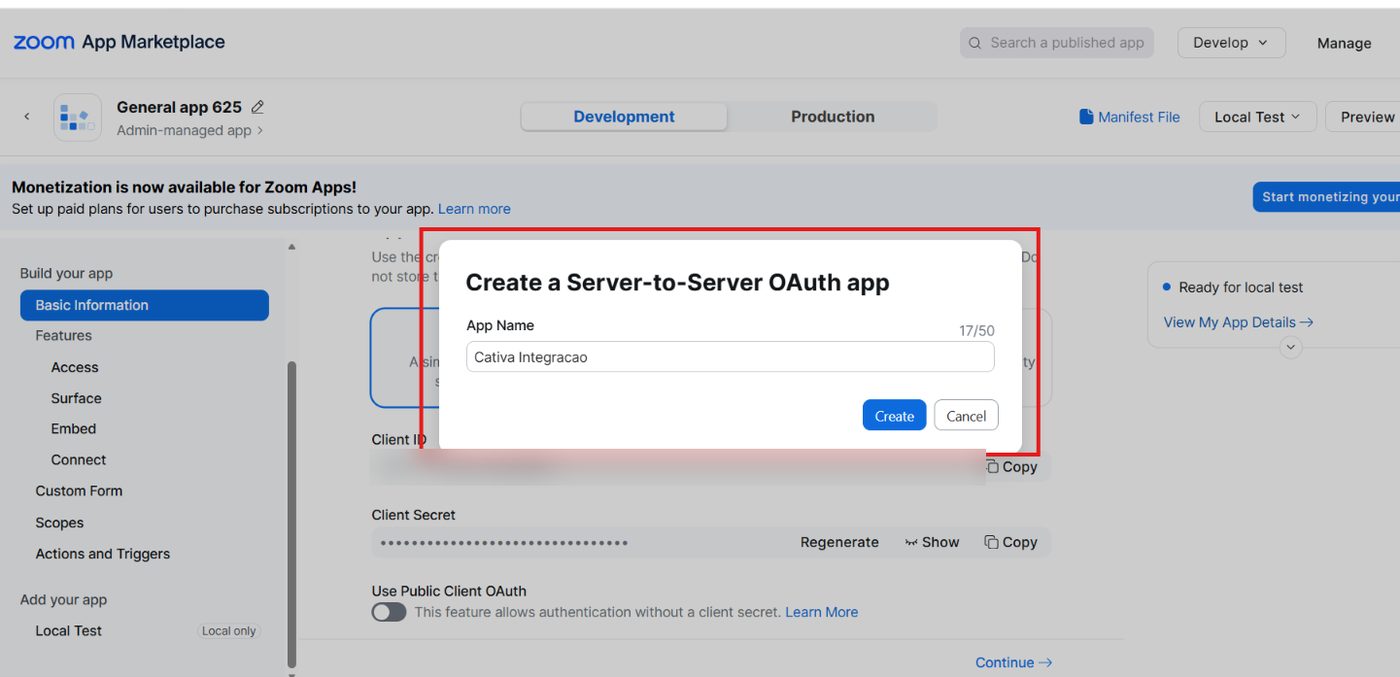
The app opens in a five-step wizard, listed in the left column: App Credentials, Information, Feature, Scopes and Activation. Go through all five in order.
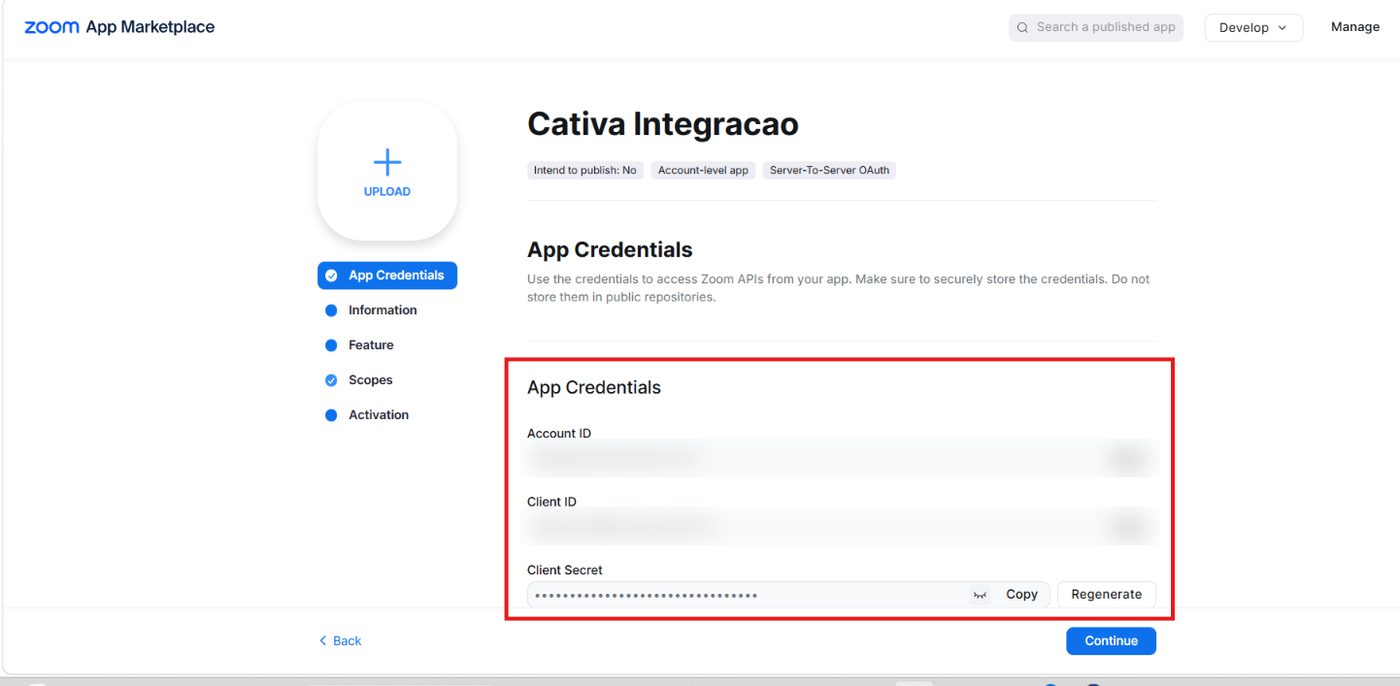
The first step, App Credentials, already shows the three values the platform will ask for. You come back here at the end — for now, click Continue.
On the Information step, fill in:
| Field | Value |
|---|---|
| App Name | Cativa Integracao |
| Short Description | Integração com Cativa |
| Company Name | Cativa |
| Developer Contact — Name | Cativa |
| Developer Contact — Email | suporte@cativa.digital |
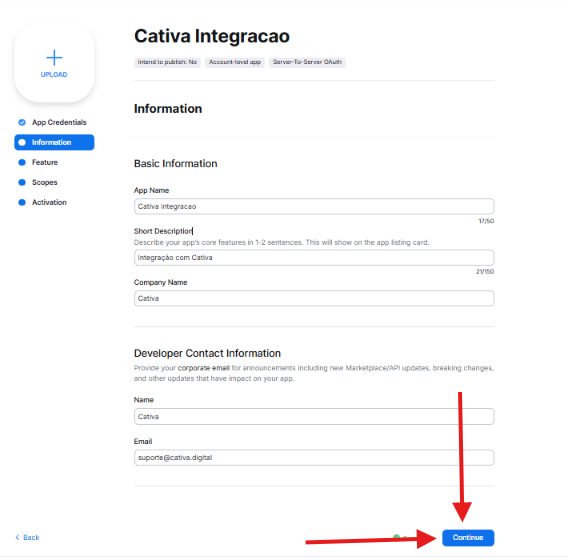
The Feature step holds the Secret Token. It is only used if you plan to receive recordings — keep the value, because it is what goes in the Webhook Secret field in step 4. If you will not use recording, just move on.
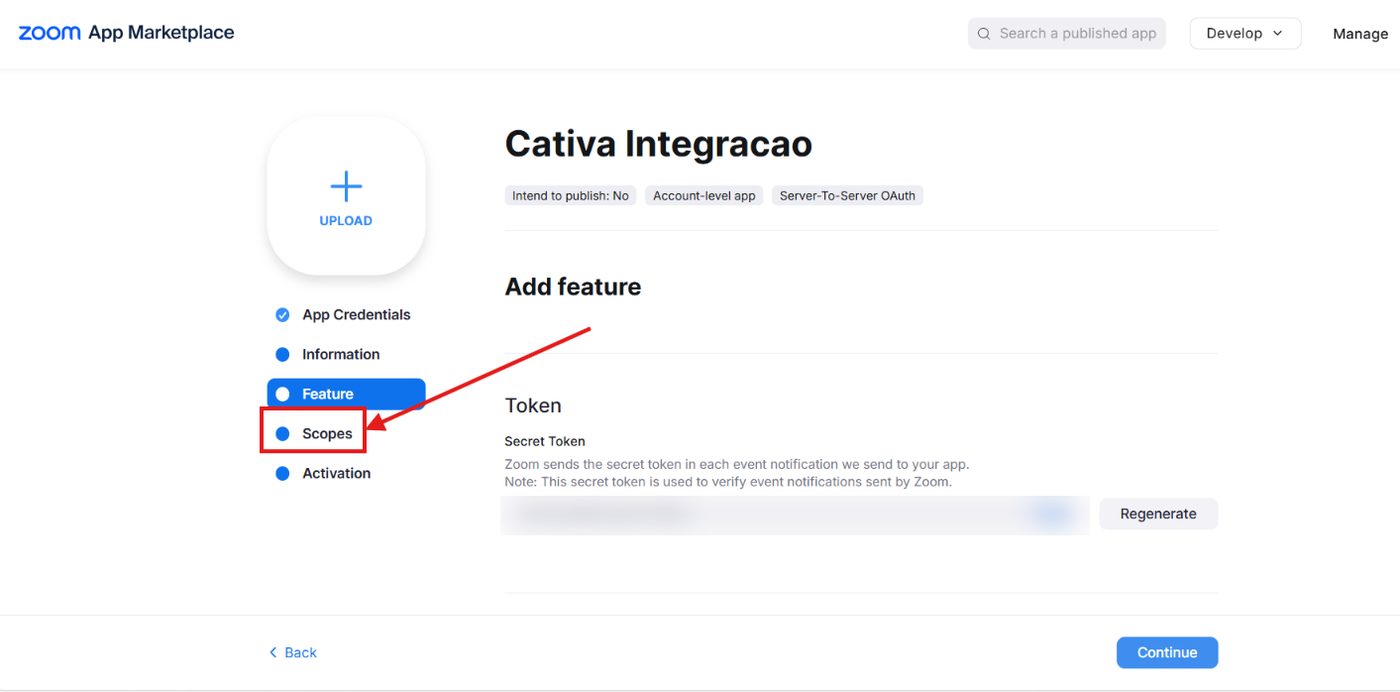
On the Scopes step, click + Add Scopes and add the nine permissions below. Each one authorizes an operation the platform needs to perform on your account:
| Scope | What it is for |
|---|---|
meeting:write:meeting:admin | Create the meeting |
meeting:read:meeting:admin | Look up a meeting's details |
meeting:read:list_meetings:admin | List the account's meetings |
meeting:update:status:admin | Change a room's status |
meeting:delete:meeting:admin | End and remove a room |
zoom_rooms:write:room:admin | Manage room availability |
user:read:user:admin | Look up an account user |
user:read:list_users:admin | List active users, to choose the host |
user:read:token:admin | Get the host token (ZAK), required to open the room |
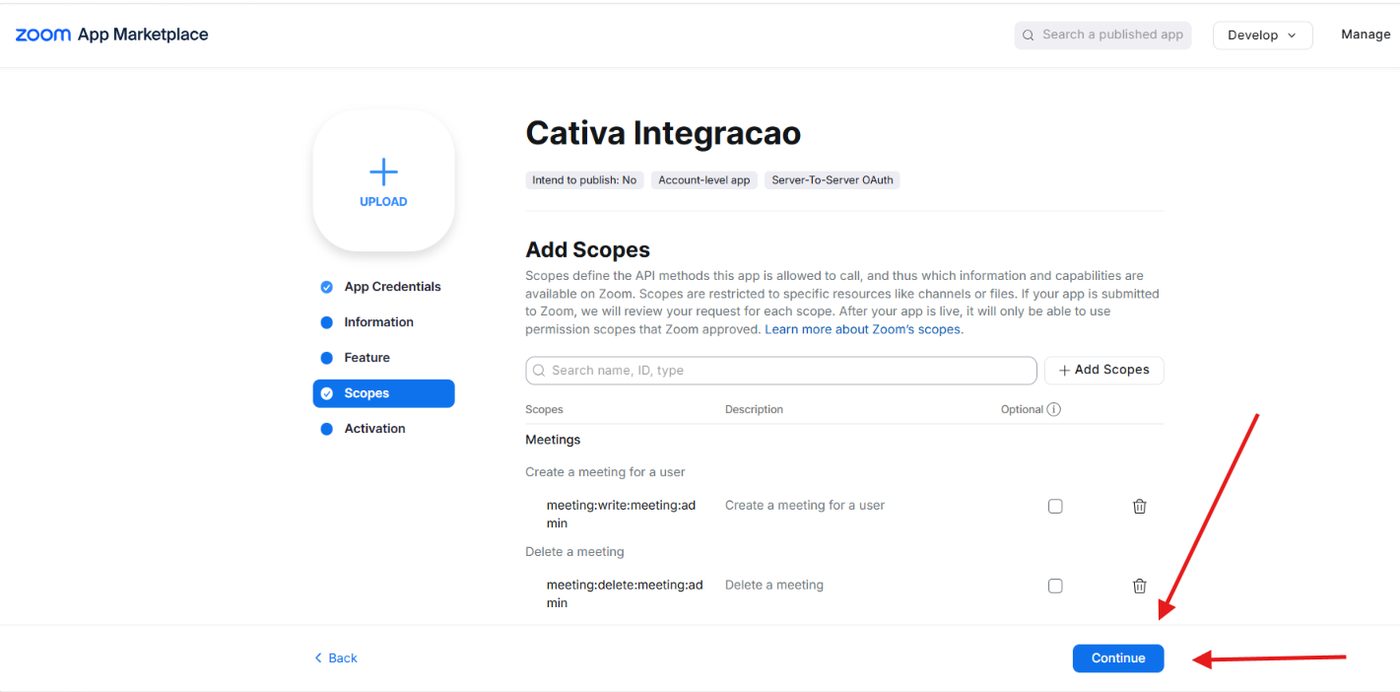
Every permission in this list belongs to the Server-to-Server app — the one with three fields. The app from step 1, with two credentials, gets none of them: it only opens the room on screen.
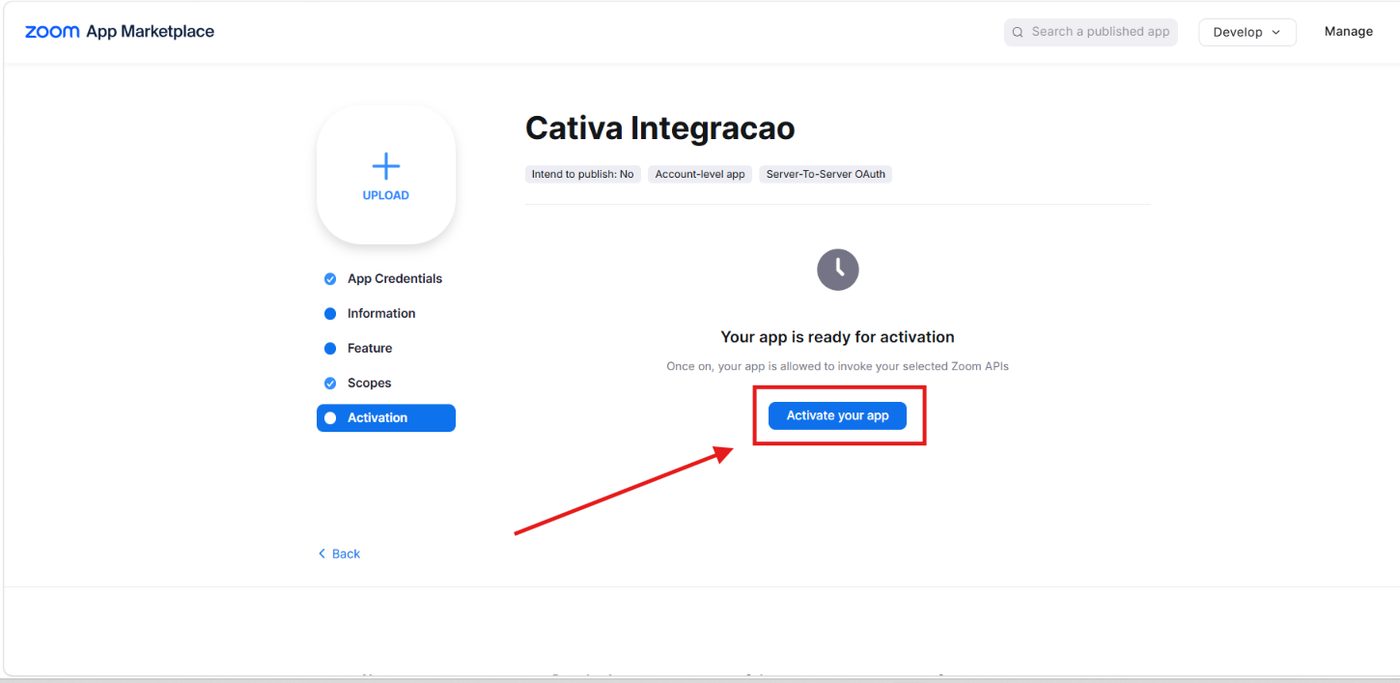
On the Activation step, click Activate your app.
Check that the screen now reads Your app is activated on the account. Without that confirmation, the credentials will not work.
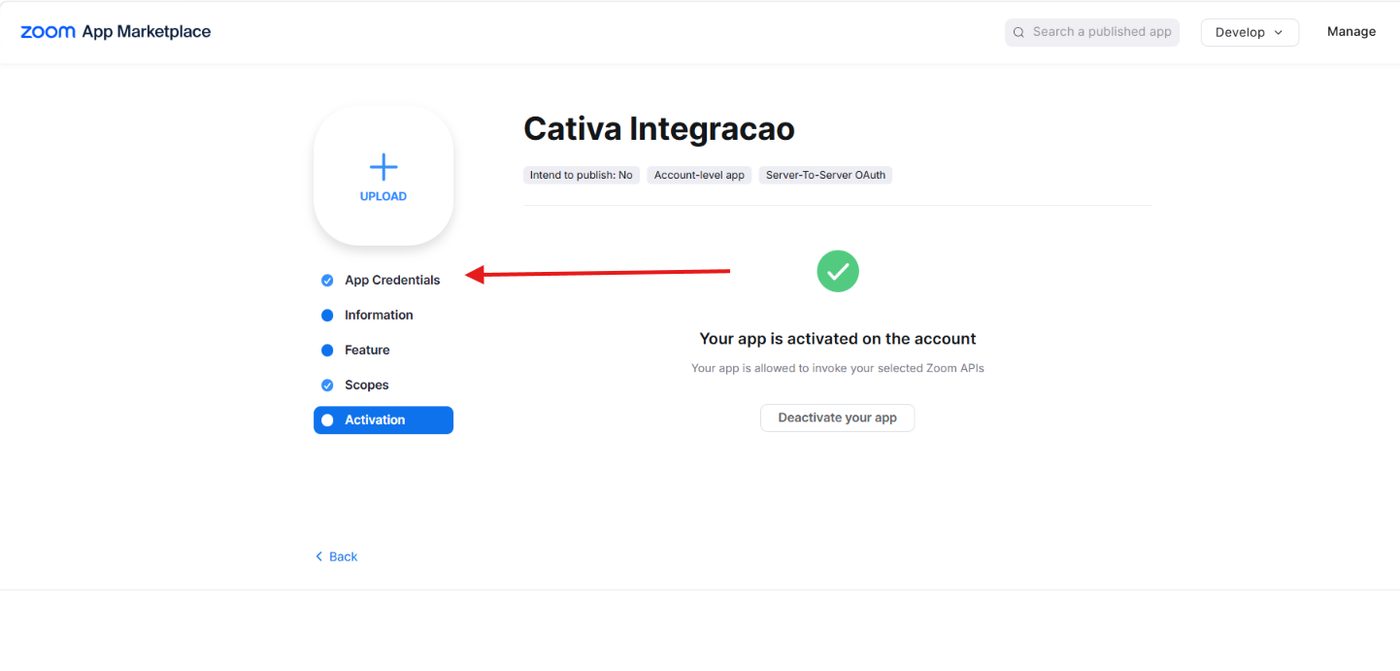
Go back to the App Credentials step and copy all three values: Account ID, Client ID and Client Secret.
If you cannot add a scope
The list of available scopes depends on your role and the account plan. Ask the Zoom owner to review your permissions. Do not replace a scope with another one that has a similar name — close names authorize different operations.
3Match each app to the correct section
Go back to the platform's Integrations › Zoom screen:
- Under Server-to-Server App Credentials, enter the Account ID, Client ID and Client Secret from the app in step 2.
- Under OAuth App Credentials, enter the Client ID and Client Secret from the app in step 1.
The field names repeat across both sections, but the values come from different apps. Client ID is not your email and Client Secret is not your Zoom account password.
4Set up recording, if you plan to use it
To receive recordings inside the platform, fill the Webhook Secret field, under Webhook (recording), with the Secret Token you saw on the Feature step of the Server-to-Server app (step 2). It does not replace any Client Secret.
The recording event subscription and the destination URL also have to be configured in Zoom. Ask Cativa for the destination address that matches your account. Filling in this field alone does not start recording or complete the delivery flow.
5Save, confirm and test before sharing
Review which app each value came from and click Save.
Then — and whenever you change scopes in Zoom — click Refresh, in the top right of the integration screen. In some communities this button appears as Verify again. That step is what makes the platform re-check the apps' permissions.
Saving the credentials does not prove that every permission works. Run a controlled meeting with whoever manages Zoom and check three things: the room is created, the host can join, and a participant can join. Only then announce a session. To set the date and audience, follow How to create an event and define who can access it.
If something fails, note the step, the time and the exact message — without sending secrets in screenshots.
Tip
To announce a session while the integration is being prepared, you can create the meeting directly in Zoom and use Enter link manually in the event form.
Frequently asked questions
I set the integration up before and can no longer create meetings
The scope list grew. Open this community's Server-to-Server app in the Zoom Marketplace, add whatever is missing under Scopes — in particular meeting:read:meeting:admin and user:read:token:admin — save, activate the app, and click Refresh on the integration screen. You do not need to create a new app or replace the credentials already entered.
Why do I need to create two apps?
Zoom separates permissions by app type. The Meeting SDK, which allows joining the embedded room, lives in the General App; creating and managing meetings and looking up users live in the Server-to-Server app. One does not cover the other.
Can I use the same credentials in both sections?
No. Check the name of the source app for each Client ID and Client Secret: the one from step 1 is called General App and the one from step 2 is Cativa Integracao.
Does the integration record the session automatically?
No. Entering credentials does not start a recording. Recording must take place in Zoom's cloud, and receiving it depends on the additional webhook setup described in step 4.
Do I need a paid Zoom account?
Yes. The features this integration uses, including administrative meeting creation, are not available on a free account.
Zoom's screens changed and I cannot find an option
Zoom updates the Marketplace often. Check the official guides for Meeting SDK credentials and Server-to-Server OAuth to follow the vendor's current screens.